
I just made a batch of 21 of these cards for the November card ministry at our church. I was mentally struggling with what to do for the November birthdays. It’s so easy to focus on “thankful” themes but that’s not a great fit for a birthday card. Here in VT the leaves are mostly gone at this point and we’ve slipped into the dreary “stick season” that characterizes late Fall. But – who says that cards have to be a literal representation of the time of year?!? We still have a lot of leaves on the trees near our house and those pesky Oaks will hold onto their leaves FOREVER. So I decided that a falling-leaf theme was just what I wanted.
Actually – there’s a bit more to the genesis of this card. Earlier this week I received a Stampin’ Up! order that included the Metallic & Shimmer Specialty paper. That was actually the inspiration for this card. There are 3 different patterns in this hidden gem from the July – December mini catalog (you can see it on page 41. The black/silver paper screams New Year’s cards to me and the Evergreen/gold paper is great for some elegant Christmas cards. That leaves this pretty autumn colored paper that is perfect for this time of year. Since the November birthdays are a relatively small group I had enough of this paper to have a 1″ strip on each of the cards. Just enough to add some glittery pizzazz to the card; the paper is more glittery than my picture conveys. It isn’t obnoxiously glittery though – it’s kinda subtle. Since this paper is only $5 for a pack I encourage you to buy your own and play with it – you won’t regret it!
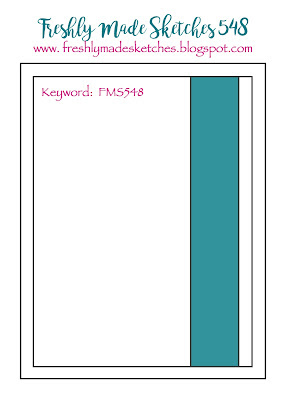
This past sketch from Freshly Made Sketches was perfect for what I wanted to do with my card. I looked for a card with a vertical strip so I could show off the glittery paper and this one matched exactly what I envisioned.
You may be wondering about the stamped image because you won’t find it in the current catalogs. I dug through my collection of past Paper Pumpkin stamps and found this image that seemed perfect to me. I paired it with the retired Layering Ovals dies and I had exactly what I wanted. That’s one of the great things about Paper Pumpkin that is easily forgotten; you get some great stamps that you can use over and over.
I also want to share a couple of techniques that I used on this card. They aren’t related to each other, and you can easily use them in your projects. Here’s the details:
- I partially embossed the leaf image on the cardstock so that the right side wouldn’t be “bumpy” under the vertical strip. Sometimes you can have the cardstock extend beyond the edge of the folder to get that effect, but that wouldn’t work for this folder. So… to solve that problem I inserted the cardstock layer fully into the folder like you would normally do, BUT when I ran it through the machine I put the acrylic plate so that the end was part-way down the folder. The acrylic plate was only covering the part of the folder that I wanted embossed, and the part that wasn’t covered by the plate stays flat. Ta da!
- The other technique I used was to very lightly rub the White Craft ink pad over the embossed image to soften the look and add some highlights to the card. That’s super-easy to do and the look is fabulous!
 |  |  | |
 |  | ||
 | |||

 Specialty Paper")


