 I finally got around to experimenting with embossing paste. It was a new product for Stampin’ Up! last summer, and I purchased all of the accessories right away. Then life got in the way and I had so many other wonderful stamping things to play with that I didn’t get to try it out until now. Honestly, I must confess that I was a little intimidated, too. I don’t know why… I tell people all the time that it’s just paper, there’s no reason to be scared about something going wrong. After all, you can just toss it and start over if it is un-salvageable. And yet, I was nervous like a stamping newbie. I finally got off my duff because I want to offer a class using the embossing paste products. That means that I have to create some samples and overcome my trepidation. This card is my first creation, and I love how easy it was to work with the embossing paste. I can’t wait to experiment some more and share here.
There are many different techniques that you can do with embossing paste. Certainly the simplest is to use it in its raw form. For this card I went one little step further. You can easily color your embossing paste (it starts out white) so that you can create a custom look for your project depending on the colors that you are using. I’ll describe what I did to create the colored paste that I used here:
- Set down some paper to protect your work surface; if stray paste gets on it, you will be unhappy.
- Tape down the cardstock that is getting “the treatment”. A couple of bits of tape on the back to hold it in place should be enough. The goal is to prevent it from shifting while getting embossed, and you need to be able to lift it easily when you’re done.
- Pull out your silicone mat and put some embossing paste on it.
- Add 1 or two drops of ink and stir using a tool. I start with a small amount of ink and add more if I want it darker. It is possible to make it lighter by adding more embossing paste, but you won’t be able to save the paste for future use.
- Put down your mask over the area to get embossed and tape down with painters tape so it doesn’t move.
- Use the palette knife to add paste where you want it and spread it around to fill in gaps.
- Use the straight edge tool to scrape off the excess paste.
- Remove your mask and WASH EVERYTHING. This paste dries pretty quickly, and it is like concrete when it does. You don’t want to ruin your tools on your first project!
- Let the paper dry thoroughly over several minutes while you’re working on other aspects of the project.
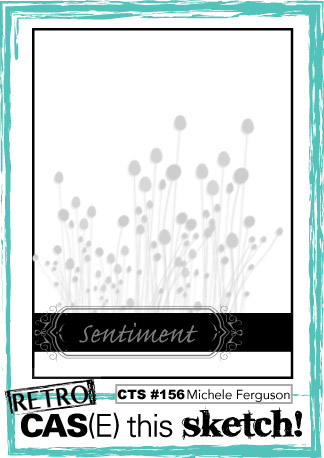 I used this sketch as the basis for my card design. I decided to alter it a bit by moving the cross strip so that it is diagonal rather than straight across. I love that they decided to do a throw-back sketch. That must have made the life very easy for the sketch designer for that week! 😉 I thought the interesting background on this design would lend itself well to a subtle embossing paste look. I also wanted to try out the Beautiful Peacock Sale-A-Bration stamp set. It was the first one that I selected, but I hadn’t tried it out yet. I love the look of the peacock with the fun background. What do you think?
Product List

|

|
||

|

|

|
|

|

|

|
|

|
|||


