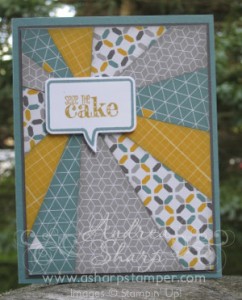
 I know that I'm late to the trend with this, but I've become fascinated with the starburst look for cards. I have a large selection of DSP after the sale in July, so I'm not scared to use what I have. Plus, I'm really trying to not give in to my normal paper hoarding tendencies. I found a couple of different approaches on-line for creating the starburst look, and I especially enjoyed this one. What I like about this card is because of the colors used, it will work great as a birthday card for a guy. The stamping isn't fancy because the starburst is really providing the energy for this card. The stamped image does provide a bit of cover for the joining point for the various rays in case they don't meet up perfectly.
This starburst is pretty easy to create, here are the steps:
- Cut a piece of copy paper to the size of the finished starburst panel.
- Pick a focal point and draw the starburst on the copy paper using a ruler and a pencil.
- Number the various sections of the panel and cut them apart.
- Put each section over the DSP that you want for that section and cut it out. Make very sure that you have the right side up of the DSP because you can't flip it over and have it work.
- Sponge the edges of the sections
- Glue the sections down on a base paper that is cut to the size for the panel.
- Mat and place on a card base.
- Add other embellishments as desired.
Product List
And, since it is Tuesday, here are the Weekly Deals:


